Hello there, the future video making star!
Have you ever actually wondered, what made the fabulous pop-up videos that some people had done?
Oh no, not fairy tale magic – it is Artificial Intelligence; one of the most powerful tools of the modern world!
Sometimes you have a great idea for a segment of the video, but no time, no skills, and, to top it, you use a computer that was popular back when Law & Order was on the air.
These tools can help you to create some nice-looking videos even before you start incanting the magic phrase of ‘upload to YouTube.’
By the end, you would be making such awesome videos, your stupid computer will give patronizing high-fives. Let the game begin? Well it is about time to get it crunk for this tech party!
Step 1: Define Your Video Concept

Here, you will find your guide to the first step of the AI video creation process.
The term Artificial Intelligence Video Generators can be used to start any discussion, and before we immerse ourselves into the topic, here is what is suggested…
In simple terms, defining your video concept is the closest thing you will have to blueprints for your building: get the design right, and the rest is going to be picture-perfect.
Why Defining Your Video Concept is Crucial?
Creating a successful video begins with a clear and well-defined concept. Here’s how to write a blog on defining your video concept, broken down into simple and actionable points:
1. Understand Your Purpose: Decide on your objectives or goals when making your video. What is the goal? To educate, entertain, persuade or just talk about the product?
2. Know Your Audience: Determine your audience for the video. Related to the age, interest, and preference of its users as well.
3. Brainstorm Ideas: A mind map should be used to expand the main idea of your speech and consider more angles and ideas.
4. Research and Inspiration: Thus, watch other videos belonging to the same category as yours. What worked well? What could be improved?
5. Create a Concept Outline: Determine the aesthetic look of the video. Will the movie be cartoonish, realistic, or partially realistic?
Plan the Content:
Planning the content of your video is like prepping for the ultimate road trip. You wouldn't just hop in the car and wing it, right? Here’s how to map out your adventure:

1. Outline Your Story: Think of the beginning, middle, and end.
2. Know Your Audience: Who's watching this masterpiece? It’s like packing everyone's favorite snacks—nobody wants that weird trail mix your cousin likes.
3. Script It Out: This keeps you from wandering off track like a lost tourist.
4. Plan Your Shots: Visualize your scenes. It’s like planning all the must-see spots and photo ops.
5. Gather Your Gear: Don’t leave anything important behind, like your camera, lights, or your lucky filming hat.
Step 2: Choose an AI Video Creation Tool

There are tools that would make your video creation much easier and enjoyable, just like having a great partner who has your back, and some great tips up his sleeve.
Several AI tools can help you create videos. Some popular ones include:
- Lumen5: For converting text content into videos.
- Pictory: For creating videos from scripts or blog posts.
- Synthesia: For creating videos with AI avatars.
- Animoto: For easy video creation with templates.
- Runway ML: For more advanced, creative video editing and effects.
Just like when swimming, don’t rush to jump into the water first, try to understand what you actually require.
- Research and Compare: Once you know what it is you are looking for, it’s now time to go a little detective.
- Test the Waters: Most of the AI video creation tools out there are free, meaning you get to try most of them for free, and get limited functionality on the others.
- Consider the Learning Curve: Consider how much time you are willing to spend to hone in on a particular tool.
- Look at Pricing: Just remember that it is frequently the case, the costly tool is not the best one for your work.
- Check for Integrations: The two types of collaborative flows can prove to be very useful when implemented because they allow for integration and can make your processes faster.
- Think About Support and Community: Having good customer support is a benefit with regard to a situation where you are in a stuck position and need assistance.
- Make Your Choice: After your research, comparing the options and trying out a couple of tools, it is time to decide.
Step 3: Gather Your Materials

Gathering your materials for your video project is like assembling a superhero team. Each element plays a crucial role in ensuring your final video is nothing short of amazing.
Here’s how to round up everything you need and make sure you’re fully equipped for video greatness.
- Text: Scripts, blogs, or any content you want to convert to video.
- Images and Videos: Any visual assets that will be used.
- Music and Sound Effects: Background music and effects to enhance the video.
Checklist:
Before you start shooting, run through a final checklist to make sure you have everything you need:
- Script: The backbone of your video. Make sure it’s polished and ready to go.
- Storyboard: A visual guide to your video. It doesn’t have to be a masterpiece; stick figures work too!
- Camera: Whether it’s a professional camera or your smartphone, make sure it’s ready and charged.
- Microphone: Clear audio is key. Test your mic to ensure it’s working properly.
- Lighting: Natural light, ring lights, or softboxes—good lighting makes a huge difference.
- Props and Costumes: Anything you need to bring your scenes to life.
- Backgrounds: Consider your setting. Is it tidy and relevant to your video’s theme?
- B-Roll Footage: Extra footage that can be used to support your main shots.
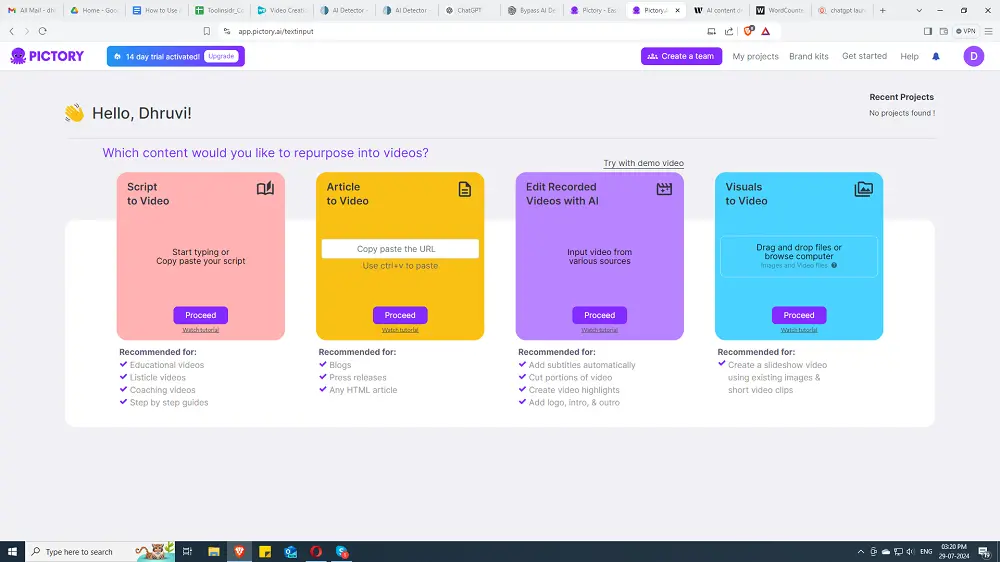
Step 4: How to Use the AI Pictory Tool to Create the Video
Are you ready to make an amazing video with Pictory? So what’s the meaning behind this, let’s do it step by step, with a little spice.
Log In to Pictory: Welcome to Pictory: the world of fantasy comes true. Password? Check. Ready to roll!

Upload Your Script or Text: Type or paste what you want me to search for in the field of screens. It is like adding that special ingredient that wouldn’t let your video down.
Add Media Files: To start your presentation, import the images, clips, and any other visuals that you intend to use in your presentation. In other words it is like carrying around a fully loaded toolbox with all the shiny tools.
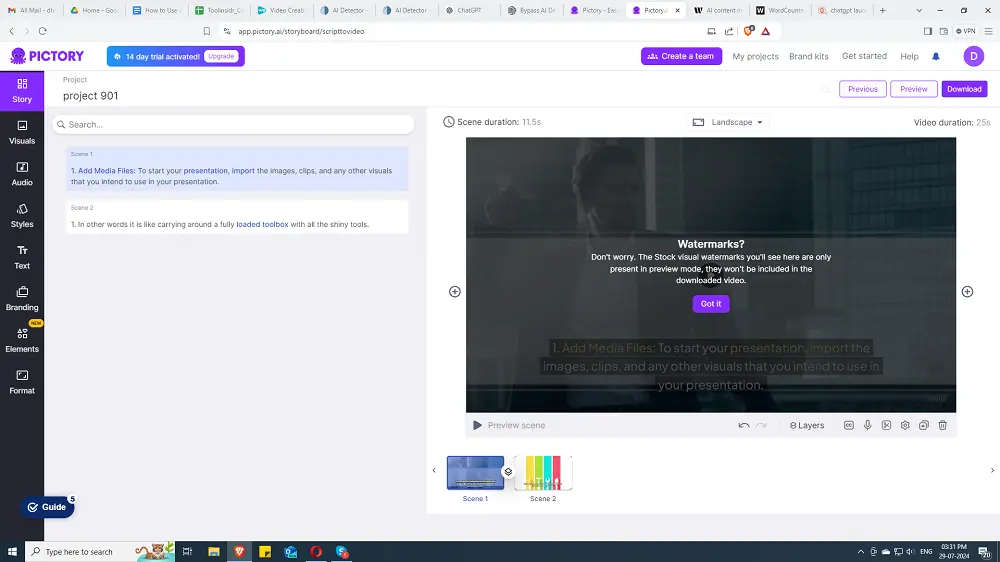
Pick a Template: Look through the templates and find one that says ‘I’m awesome!’ It’s like picking the right dress for a date.
Drag and Drop Scenes: To move forward, sort your scenes into the order of time. Well, it appears to be a game like Tetris, but you rub the actual video clips into it.
Add Text Overlays: The basic idea is that you literally sprinkle in some text. It is as simple as providing subtitles for the laugh-out-loud funny memes.
Trim and Cut Clips: Trim the fat; cut the motion where there is no action. Play the role of a ninja with those scissors, virtual.
Adjust Timing: Ensure that all of it is well coordinated. More simply put, it is like playing music to an audience, but instead of playing an instrument one has to conduct an entire orchestra – without nearly as much pressure.
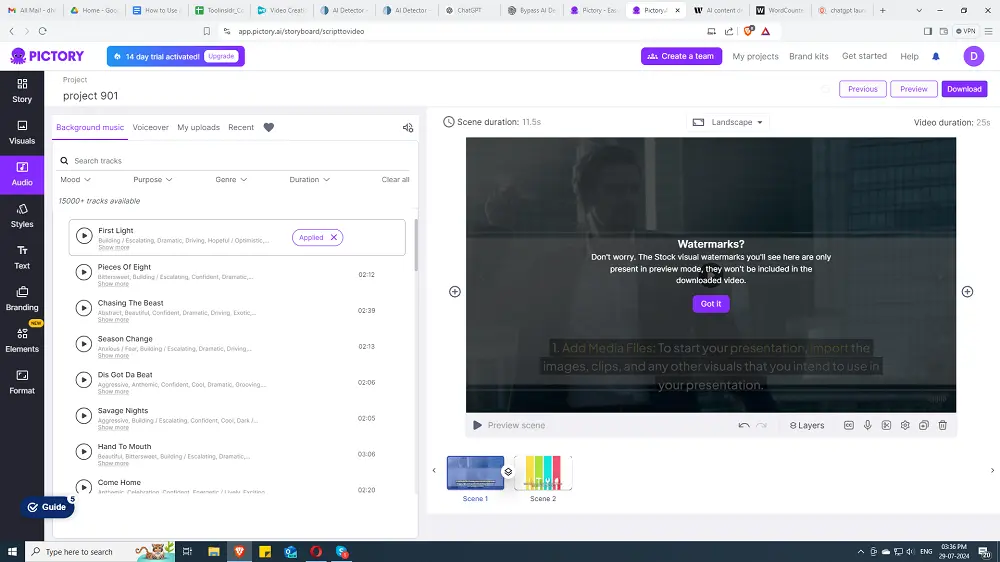
Add Music and Voiceover: It is the rhythm that is usually added on your video, it’s like endowing your video with a heartbeat as well as a voice.

Automatic Scene Selection: Here, let AI select what you want to offer as the building of scenes is elaborate. To put it into words, it is like you have a very smart clerk who understands everything you may desire.
AI Text-to-Speech: Employ AI to record your voice over from the said script. Choose a voice that is cool as if you are telling it to your best friend.
Step 5: Final Edits and Enhancements
Proofread for Errors: Correct spelling, grammar, and punctuation mistakes.
Ensure Clarity: Simplify complex sentences for better readability.
Engage with Media: Add images, videos, or infographics to make your post more attractive.
Fact-Check: Verify facts and cite reliable sources.
Optimize SEO: Use relevant keywords to improve search engine visibility.
Read Aloud: Identify awkward phrasing and improve flow.
Final tweaks make your blog shine and ready to impress your readers!
Step 6: Publish and Share
Give your blog post one last look to catch any sneaky typos.
Hit the "Publish" button and watch your words come to life!
Share the link on social media and with your friends – spread the word!
Dive into the comments and enjoy the lively discussions with your readers.
Golden Tips for Success
Plan Your Script: Outline your content before creating the video.
Keep It Short: Aim for concise and engaging videos.
Use High-Quality Images: Choose clear and relevant visuals.
Add Subtitles: Ensure your message is accessible to everyone.
Preview and Edit: Check your video for any mistakes before publishing.
Share Widely: Promote your video on social media and relevant platforms.
FAQs
Save tons of time with speedy AI magic. No need for a degree in film editing; AI makes it simple. Leave all the boring parts to the AI while you enjoy yourself to the fullest. Do not make your wallet unhappy; learn how to edit with little money. Ideal for every possibly imaginable video, from pets to business meetings.
Absolutely! AI video generator tools are a breeze to use. They have super simple interfaces, handy guides, drag-and-drop magic, awesome templates, automated edits, and you’ll be a pro in no time!
AI video generator tools can be used by novices, bloggers, marketers, educationalists, schools, students and amateurism. They are ideal for anyone who wishes to create easy and fast professional-quality videos.
AI-generated video works by taking your input (like text, images, or clips), working its magic with cool editing tricks, and then spitting out a shiny, professional video that's ready to wow your audience!
Students in school use AI video generator tools to develop effective material for presentations, and save their valuable time with creativity and quality in terms of creating school videos.